lördag 28 maj 2016
Faking Fullscreen!
As previously mentioned in "Compute shader and migrating to Monstro" we have had problems running the standalone executable in fullscreen. We figured now is the time to fix this problem as it really lowers the quality of a project which we otherwise are very happy with.
We were on track working towards the solution when we tried to fix this problem earlier. When the scripts start executing it forces the window to set a size of 4096 x 2400 which is the resolution for Monstro's desktop. The program is the running a windowed version which is bordeless, which makes it look to be fullscreen. What we also had to do was to set the spawning position of the window, which is at position (0, 0) in the leftmost desktop. To do this, we had to use a script that detected the name of the window (our project's name) and then execute the commands to move the window through that script.
We were on track working towards the solution when we tried to fix this problem earlier. When the scripts start executing it forces the window to set a size of 4096 x 2400 which is the resolution for Monstro's desktop. The program is the running a windowed version which is bordeless, which makes it look to be fullscreen. What we also had to do was to set the spawning position of the window, which is at position (0, 0) in the leftmost desktop. To do this, we had to use a script that detected the name of the window (our project's name) and then execute the commands to move the window through that script.
Introducing: Northern Lights
So. At this point in the project basically there has lately been a lot of tweaking. What we realised when playing around with different settings and so on is that the particle system sort of resembles northern lights if we just were to edit the colors a bit.. so we did! And we also decided to change the name of the project at this point. We went from CyclooPS to just "Norrsken" (Northern Lights in Swedish). We also added some nice creative commons spacey music.
The best thing to do here is probably just to post a bunch of videos:
The best thing to do here is probably just to post a bunch of videos:
1: Playing around with the hands' strength. Here the pull of the hand is pretty low which allows particles to escape. Creates this kind of effect:
2: Putting up some signs on the screen and just observing the patterns that appear:
3: A bit more of the same stuff...:
And that's that.
Fixing a crucial bug with particles flying away with extreme speed
The thing about Newtonian gravitational physics is that when we put it into a system like this, it will create some odd behaviour.
The most pressing problem for us was that somehow we realized (by using the system for a long time) that particles started disappearing. We needed to find out why.
After some digging in the code we realised that if the particles, in one frame, is extremely close to a hand, it's speed will be (by the laws of physics) be divided by 1/r squared. What this means is that if the distance between the hand and the particle is, for example, 0.000001, the particle will get a speed that easily surpasses light speed. That means, in our world, that the particle never ever will be seen again, as it has flown far, far away...
The solution required multiple edits to the "physical laws" of our system.
First, if the distance that is about to be calculated is lower than 0.01, we set it to 0.01. This essentialy is a speed limitation.
Second, if the particle flies outside the screen, not only does it stop, but its coordinate is moved back to the edge (e.g. the particle moves to x = 900, but max of x (the edge) is 105, so we set it to 105).
Third, If a particle reaches an extremely high velocity, we gradually reduce its speed (deceleration) by a factor of 0.9 each frame to a linear max velocity that we have set. This third solution actually is not really a requirement, but rather something that creates a really aesthetically pleasing effect behind the hands' interaction. Check out this video:
Particle behavior, physics, interaction and restrictions
When we finally had a beta version of the particle system up and running we continued working on changing the behavior of the particles movement. This step in the process is highly dependent on the touch interaction working correctly so the feedback upon touching the screen is perceived as expected.
Touching the screen and physics
A hand touching the screen is supposed to simulate the placement of a gravity source at the location of the hand. This means that every particle is going to be affected by a certain force depending on its position relative to the hand touching the screen. All the calculations are based on Newton's law of universal gravitation, in order to get real physics behavior. The following formula can be used to describe the force which affects each particle. G is a gravitational constant, M and m are the masses of the two different objects, i.e. the gravity source (a touching hand) and a particle. r is the distance between these two. All these variables result in the force Fg.
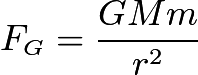
Touching the screen with one hand will thus add a force directed from each particle towards the position of the hand. This will alter the velocity and direction in which the particle was previously heading, for each rendered frame. Particles which are far away from the hand will not be affected nearly as much as those closer to the hand, due to the division by the distance squared.
Once there is more than one hand touching the screen, this calculation has to be performed for each hand, on all the particles. The forces can then be sumarized to get the final force to change each particle's direction and velocity. Hence, there are a ton of calculations being done in order to render each frame, which is one of the main reasons we wanted to use the GPU in the first place.
One thing to note here is that the particles do not add any force to all the other particles in the scene, even though the formula states that they clearly would. However we did not like that idea, and only wanted the user interaction to be what changes the state of the scene. To further motivate why the particles do not affect each other it could simply be for the reason that their masses are too insignificant to result in any force big enough to be worth taking into account.
Restrictions
A couple of problems occured while implementing everything mentioned above.
Touching the screen and physics
A hand touching the screen is supposed to simulate the placement of a gravity source at the location of the hand. This means that every particle is going to be affected by a certain force depending on its position relative to the hand touching the screen. All the calculations are based on Newton's law of universal gravitation, in order to get real physics behavior. The following formula can be used to describe the force which affects each particle. G is a gravitational constant, M and m are the masses of the two different objects, i.e. the gravity source (a touching hand) and a particle. r is the distance between these two. All these variables result in the force Fg.
Touching the screen with one hand will thus add a force directed from each particle towards the position of the hand. This will alter the velocity and direction in which the particle was previously heading, for each rendered frame. Particles which are far away from the hand will not be affected nearly as much as those closer to the hand, due to the division by the distance squared.
Once there is more than one hand touching the screen, this calculation has to be performed for each hand, on all the particles. The forces can then be sumarized to get the final force to change each particle's direction and velocity. Hence, there are a ton of calculations being done in order to render each frame, which is one of the main reasons we wanted to use the GPU in the first place.
One thing to note here is that the particles do not add any force to all the other particles in the scene, even though the formula states that they clearly would. However we did not like that idea, and only wanted the user interaction to be what changes the state of the scene. To further motivate why the particles do not affect each other it could simply be for the reason that their masses are too insignificant to result in any force big enough to be worth taking into account.
Restrictions
A couple of problems occured while implementing everything mentioned above.
- What happens if a particle reaches one of the screen's edges?
- What behavior do we need to implement for those cases?
- Do we need a bounding box?
- Should all edges have the same behavior?
The first thing we realized is that we have to set a bounding box. There is no point of having particles outside of the visible parts of the scene, and if a particle would travel too far away, it would be very difficult to pull it back into frame due to the large distance it could build up.
Particles without a bounding box
Thus, we set limitations for all edges. Any particle exceeding the limit would have its position capped and its velocity set to zero depending on which axis it would try to exceed. For instance, if a particle is trying to escape on the left side of the screen, i.e. on the negative side of the x-axis, it will have its x-velocity set to zero, while the y-velocity remains the same. Thus the particle will slide along the edge of the screen until it reaches a corner, where the same thing would happen to the y-velocity.
This means particles trying to exit the scene stick onto the "walls" and corners. When being attracted back towards the center of the screen, the particles form cool looking shapes which we thought was an amazing feature.
Stopping particles which go too far
One exception is the upper edge of the screen. In this case we did not want the particles to stick to the edge, because it is hard to reach the top of the screen due to its height. Thus those particles stuck at the top are having a hard time getting back into the action. Therefore, we set the top edge to bounce the particles back down, simply by reversing the y-velocity and scaling it down by a factor 10 in order to maintain smooth movement and prevent chaos.
Bouncing particles back from the wall
Pacticles appear at the other side (experimental feature, not implemented!)
Sticky walls and bouncy top (final version)
Multitouch working with the Particle System
As the touch wasn't really working at all this was the next step.
The problem was actually a combination of a couple of things. Firstly, for some reason, the GPU does not want to for loop (despite our best efforts with settings etc) over our array of hand data. This meant that we in the end decided to make each hand a separate variable that is sent to the GPU. Apart from that, there were some data type issues which occured when moving the hand data to the GPU. In the end, a C# Vec2 can be sent to a recieving variable of type float2 in the shader - this might be good to know for someone trying to do something similar to us.
The problem was actually a combination of a couple of things. Firstly, for some reason, the GPU does not want to for loop (despite our best efforts with settings etc) over our array of hand data. This meant that we in the end decided to make each hand a separate variable that is sent to the GPU. Apart from that, there were some data type issues which occured when moving the hand data to the GPU. In the end, a C# Vec2 can be sent to a recieving variable of type float2 in the shader - this might be good to know for someone trying to do something similar to us.
While there probably is a better solution (regarding not looping over hands but rather going over them one by one in a really ugly piece of code repetition), we decided to leave this as well for now as we actually got stuff working. Here's the video:
Touch interaction not working as intended
As promised in the last post, here is a video of the particle system with hand interaction that is sort of not working, but at least doing something!
We want the hands to act as "gravity sources" or planets that affect the particles with newtonian physics. Therefore we now have to work a lot on actually getting the hand data in the correct way to the shader. Probably the problems occur because of a restriction in the shader or just some small error that we just haven't found yet.
We want the hands to act as "gravity sources" or planets that affect the particles with newtonian physics. Therefore we now have to work a lot on actually getting the hand data in the correct way to the shader. Probably the problems occur because of a restriction in the shader or just some small error that we just haven't found yet.
Setting up first version of particle system on Monstro.
The bad thing about going from OpenGL and vert/frag shaders to Compute shader is that we kind of have a lot of knowledge on OpenGL that we might not be able to use. Of course, graphics programming is going to be sort of similar but it still feels like we have done a lot of work that we just scrapped to try to move over to compute shading. (Of course, all the interaction programming as well as the theories behind our graphics programming is still intact - which is a lot by itself, but it feels a bit annoying to have to get rid of so much work anyways).
Nevertheless, we did some reading and looked at some examples and used some pieces of code that we could manipulate into our own project. Ultimately, we learned a lot from this step - as we did when setting up the first version of the OpenGL system.
For example, we learned that modern GPU:s process data points in batches of 32, which means that our particle system should be a multiple of 32 for the highest efficiency.
We also decided to move away from the idea of using textures to store the particle data. This is not because it would be impossible to do with the compute shader. It is rather because we could simply use a buffer and achieve a very high particle count anyways.
We decided that the 3.2 million simultaneous particles (at 60FPS) we achieved on the first try by using ComputeBuffer basically was enough and we decided to, at least for the moment, not explore the possibility of using textures as storage. At this point we have already worked so many hours on this project so it is really time to leave the small optimizations and try to achieve something that works.
The next post will show you the particle system and the not-so-well-working hand interaction.
söndag 1 maj 2016
Compute shader basics and how using a compute shader could move our project forward
The advantage of now having a computer shader to work with is that we don’t have to worry about working out a way of identifying vertices. The indices of the vertices are are built in, hence every vertex can be identified. Another important advantage with the compute shader is that we can send more advanced datatypes inbetween the CPU and GPU, we could basically just send an array containing the data needed on the GPU (e.g. not having to encode hand data in textures).
This concludes in that we hopefully could perfom the physics calculations and control the behaviour of the particles relatively smoothly. Most of the work from here on has included learning the syntax of Unity’s computer shader. The debugging is kind of hard and time-consuming since the error-messages from the shader are not very specific or extensive. This forced us to come up with multiple creative ways of debugging.
We will use our newly gained sort of shallow knowledge on compute shaders to attempt creating a particle system as well as moving the particles on Monstro. Hopefully we will get all of these as well as multitouch working within a reasonable time.
Compute shader and migrating to Monstro
Due to the problems mentioned in the previous post with Unity and the lack of support for GL_POINTS, we were desperate to find another solution to keep pushing the project forward. We had earlier thought of compute shaders which we tried out on Niclas laptop and they seemed amazing. Sadly, the Z1 server which is the home for our project has an older GPU which only supports up to DirectX 10.1 and thus not compute shaders.
There is another server available in the studio, Monstro, which has a GTX 780 Ti and therefore has support for DirectX 11 and thus compute shaders. Up until now we wanted to stay away from this server because its desktop is configured by multiple lower resolution desktops and thus leading to problems with fullscreen applications, like the .exe we intend to build.
We decided to give Monstro a shot and halt development on the Z1 server. We also considered moving the project over to WebGL (which we know supports GL_Points as Erik has created a particle system in WebGL before), but this idea died rather quickly since we did not want to implement the Tuio API again for a web based application when we already had it up and running in Unity.
As predicted, Monstro’s 4x desktop configuration does not allow the standalone .exe to run in fullscreen. We tried several different approaches in order to make it fullscreen, but without finding an appropriate solution. Our first idea was to force the application to run in 4096 x 2400 resolution by telling it to do so in the scripted launched on startup. This made it fullscreen, however only on one desktop, leaving the majority of the screen empty.
In our second attempt we tried to configure a multi camera setup in the Unity scene and thus force the application to run two different fullscreen modes where the cameras render one half each, synchronized. Again, we got close to finding a solution but not quite. The two views were misaligned no matter how we tried changing clipping planes and positions for the two cameras. This solutions seems too technical and hard to get working. Probably we will not explore this method further
By the end of the day, we managed to have the application up and running in 4096 x 2400 resolution, however in windowed mode. If we align the window properly, it looks sort of alright but it is not a solution we want to keep by the time we finish the project.
The solution we believe will work in the end is somehow forcing the application to run in 4096x2400px in a borderless window mode, which spawns at 0,0 in the leftmost desktop. That should mean it spawns over desktop 1 and 2, faking a “fullscreen app”.
However, we believe what we had at this point was good enough for the time being as it accomplished the goal. We decided to keep working on the compute shaders instead in order to have a particle system working with multitouch which is what the project is really about - not setting up a fullscreen app on Monstro...
The death of Z1-server and OpenGL: realizing that OpenGL in unity will never support our solution.
This post is extremely important but won't have any images as it is only a long explanation on why we had to move away from OpenGL in Unity on the Z1 server.
The solution we had intended, which consisted of storing and encoding particle values in two 2D textures (using the color values as 1) coordinate values and 2) velocity/direction values) was a very good idea.
The theory was that we could either 1)
use the built-in gl_VertexID (integer) to decode that value from an int to a vec2 value which would correlate to a position in the texture. For example, if the texture is a 5x5 texture (25 particles) and you have gl_VertexID = 6 (first vertex has index 0), it would mean that that particle’s correlated position within the texture is (1,1).
use the built-in gl_VertexID (integer) to decode that value from an int to a vec2 value which would correlate to a position in the texture. For example, if the texture is a 5x5 texture (25 particles) and you have gl_VertexID = 6 (first vertex has index 0), it would mean that that particle’s correlated position within the texture is (1,1).
or 2)
Give each vertex a custom attribute which was a vec2 that correlated to that particle’s index in the texture - so basically the same as method 1) except that we instantiated for each vertex before our shader code even started exectuing so to speak.
Give each vertex a custom attribute which was a vec2 that correlated to that particle’s index in the texture - so basically the same as method 1) except that we instantiated for each vertex before our shader code even started exectuing so to speak.
Unfortunately, because of our newly gained knowledge on how particle systems and OpenGL works in Unity, both of these solutions are impossible due to two reasons:
1) Unity does not allow custom attributes for vertices (at least in the OpenGL versions available to us) - which means we could still solve our problems with gl_VertexID as described above
2) Unity does not support GL_Points mode. This ruins everything and requires a longer explanation.
2) Unity does not support GL_Points mode. This ruins everything and requires a longer explanation.
When doing per-vertex operations, which we require since we need to calculate new directions and velocities for each particle, the shader has to run in GL_POINTS mode. This means that, since Unity by default runs the shader in GL_Quads mode (changable to triangles or lines), each particle consists of four vertices.
The way these are arranged are unknown to us. This means that if we correlate one of the vertex points, which we hoped was one particle, to our texture, it makes no sense for the GPU - it wants four vertices per quad.
The way these are arranged are unknown to us. This means that if we correlate one of the vertex points, which we hoped was one particle, to our texture, it makes no sense for the GPU - it wants four vertices per quad.
There might be a solution where we find out how the vertex IDs are stored in gl_VertexID - for example the first quad perhaps has the vertex indexes 0,1,2 and 3. However, it seems like we are moving farther and farther away from our idea of optimizing the particle system (for example this obviously requires four times the operations => potentially four times fewer particles).
When I (Erik) realized these problems late at night in the VIC studio, I started to think that I would have explain this in detail to the others ASAP so we could figure out a way to move on from this point. Probably, I assumed, we would have to reconsider the idea of using the “Monstro” server with the 780Ti GPU:s which have dx11 and thereby can utilize compute shaders. In other words, scrap all of our texture scripts and shader code. Woah.
When I (Erik) realized these problems late at night in the VIC studio, I started to think that I would have explain this in detail to the others ASAP so we could figure out a way to move on from this point. Probably, I assumed, we would have to reconsider the idea of using the “Monstro” server with the 780Ti GPU:s which have dx11 and thereby can utilize compute shaders. In other words, scrap all of our texture scripts and shader code. Woah.
måndag 11 april 2016
Changing priorities in order to keep moving forward
As we did not have much success neither with compute shaders or VBOs we had a hard time moving forward with altering the particle system in a way which would fit our goals. We therefore decided to put this problem on hold for a while and instead work on other essential parts of the projects.
Something worth noting here is that we most likely have to keep investigating how to save the Particle System data in the VRAM of the GPU. One way to handle this is to keep investigating the VBO and possibly get it up and running to give us the desired effect. An alternative would be to find another solution to handle this problem. We have read a very interesting article where they used a texture to encode particle data. This could be a very quick way for us to store the particle data and easily access it in the next frame. The blog post can be found here: http://nullprogram.com/blog/2014/06/29/
Since we stopped working on the particle system for a while, we decided we should start working a bit more with handling the multitouch in the shader. We realized that this had to be done at one point anyways.
The problem with passing data to the shader in Unity is that we are very limited in the amount and types of uniforms we can send. For example, Unity cannot send an array of data to a GL shader program. So we had to get inventive.
We realized after a while that a texture is basically a big matrix that can store data in a sort of efficient way, if we are smart about it. Basically, we defined a maximum number of hands that we allow for multitouching the screen. For now, we set that number to 20, but it could be increased in the future. The shader needs to know a couple of things about the hands to be able to do calculations. The main thing is of course the current position. But, the initial position of the touch is also relevant - that way we can track how much the user has moved the hand without lifting the hand off the screen.
This meant we needed a 20 by 2 texture to store our data. Since each pixel in the texture consists of a vec3 (or vec4 if using RGBA), we are able to store quite a lot of data in a quite small texture. The first position in the texture, [i , 0], contains the x and y coordinates for the i:th hand. The second position, [i , 1] contains the intial position of the hand. This means that in the red component of the vec3 in the 0:th position contains the x value and the green component contains the y value. Same goes for the 1:st position.
We realize we could have had an even smaller texture (20 by 1) by encoding a RGBA value as x, y, xOld, yOld. However, with the way we have done it now we have reserverd some space in case we want to send some other data at a later stage. Also, this is an optimization that is probably completely unnecessary as the amount of data we are passing is already small. However, we will consider moving to the 20 by 1 texture at a later stage if we find no use for the now zero-value blue position and alfa position in the RGBA-array.
We are now working on decoding the hand position data inside the shader. However, it is difficult as debugging on the shader is nigh impossible. A sudden realization we got while writing this blog is that the reason we can't decode multitouch data at this moment might be that the texture expects values from 0 to 255 and not floating points between 0 to 1... We have to explore this...
Investigating other ways to create an efficient particle system
After defining our goals with the particle system, we soon came to the conclusion that simulating space orbit and recreating gravity fields was a very complex task with ordinary vertex and fragment shaders.
Since we did not have a solution where we could update the particles' positions on the GPU, we realized we either had to solve that problem or create a function based on time to simulate gravity. However, this is mathematically very complex and requires a numerical solution. Additionally, we would have had to store the time frames for where hands had been in the past, to be able to "remember" how the particles had been simulated up until the current time.
This meant that we after a couple of attempts using the Vertex and Fragment shader started looking for alternate solutions. First we looked at how to implement and use VBO:s (Vertex Buffer Objects). They are normally used to upload vertex data to a GPU device. Since they use the VRAM on the GPU side instead of regular RAM they offer much better performance when used correctly. Unfortunately, we couldn't find any good examples of how to use them when scripting in C# and Unity, so we continued our search for other solutions.

We then looked at other types of shaders. We found that compute shaders is a very good and quite straight forward solution when creating a system with a lot of particles. Basically, compute shaders is a more modern technology compared to vertex shaders where the shader takes advantage of a large number of the GPU:s parallel processors for computing purposes, which enables high-level graphics. For example, many particle effects and systems in modern games use compute shaders to do graphical calculations. We found a lot of documentation on compute shaders and particle systems, which was promising. In other words, this seemed to be the solution we was looking for.
Due to how the compute shader works, it requires the GPU device to be fairly modern. In particular, one requirement is that the graphics card supports the DirectX 11 API. This was a problem since the GPU on the computer connected to the big 4K screen was a Quadro FX 5800 which didn't support DX11. So as unfortunate as it was, we couldn't continue with this approach and had to look for other solutions.
Since we did not have a solution where we could update the particles' positions on the GPU, we realized we either had to solve that problem or create a function based on time to simulate gravity. However, this is mathematically very complex and requires a numerical solution. Additionally, we would have had to store the time frames for where hands had been in the past, to be able to "remember" how the particles had been simulated up until the current time.
This meant that we after a couple of attempts using the Vertex and Fragment shader started looking for alternate solutions. First we looked at how to implement and use VBO:s (Vertex Buffer Objects). They are normally used to upload vertex data to a GPU device. Since they use the VRAM on the GPU side instead of regular RAM they offer much better performance when used correctly. Unfortunately, we couldn't find any good examples of how to use them when scripting in C# and Unity, so we continued our search for other solutions.

Screenshot of a simple particle system done in Unity with a Compute Shader
Due to how the compute shader works, it requires the GPU device to be fairly modern. In particular, one requirement is that the graphics card supports the DirectX 11 API. This was a problem since the GPU on the computer connected to the big 4K screen was a Quadro FX 5800 which didn't support DX11. So as unfortunate as it was, we couldn't continue with this approach and had to look for other solutions.
fredag 8 april 2016
Defining our goals with the particle system
Now that we had done some computations on the particle system and had gotten our multitouch to work, we were faced by a real problem: We needed to specifically define what we wanted to do and even more specifically how we wanted to affect the particle system based on our input.
We came to the conclusion that we wanted to simulate physics behavior in space. This means we wanted to make the hands touching the screen into big planets with high mass and at the same time give the particles a very low mass, causing them to orbit our "planets". Multiple hands would create more and more interesting behavior from the particles. This meant that we had to create a function based on time that described the orbits around the hands.
At this point we were very tired of discussing what to do with the particle system, so we decided to start implementing things during the next work session.
Moving the particles on the GPU
We started to experiment with moving the particles on the GPU side. Firstly, we wanted to move the particles somehow. After some research and previous experience we decided to try to make a moving star field/vortex simulation.
We figured that we could simulate it depending on the elapsed time by using modulus and sinus operations. The mathematical operations are "static" as such, they will loop forever. We also experimented with user input by sending touch data and moving the system accordingly.
Watch videos of the simulation below.
Moving the particles along the X-axis:
Moving the particles towards the camera with a spin effect:
Moving the particles with touch input:
onsdag 6 april 2016
Optimizing the multitouch
This will be a short post regarding the optimization of the multitouch.
As described in an earlier post, multitouch was handled by calling a function for every hand on the screen. This was a massive load on the CPU - it attemped to update graphics not every frame but as often as it could for every hand.
Instead, we decided that we would push the hands into a Dictionary, where the hands' ids are the keys and the position the values. We created a specific class to keep track of all the information required to handle our hands - here we refer to the source code for the interested reader.
Lastly, instead of using up all our CPU power we now had a Dictionary with our hands in it, ready to be used by either the CPU or the GPU (the goal, however at this point we do not have a solution on how to send the hand data to the GPU - it is a later problem).
Problems with TUIO and Unity
For the interaction part, we wanted to use the TUIO/CCV image API with our Unity project. This worked fine until we tried to build the project and run the exe file, and the touch input wouldn't work at all. We really wanted to fix this since we wasn't interested in being forced to run the program through the Unity editor.
We tried several solutions. For exampe, we deactivated the firewall since we initally thought that it would occupy the same port as TUIO. However, this didn't solve anything. We also tried to implement other TUIO-supported API:s. One of these was the TouchScript API, which was supposed to work with TUIO, but it didn't work either.
It was very hard to find any documentation on TUIO and Unity, and it was even harder to find a solution to the Unity build problem. After some extensive Google sessions, we found only one (!) post that even mentioned this problem (read it here). The solution there was to do modifications in the actual TUIO API (or try to implement another modified TUIO protocol). At this point, we almost gave up since it seemed impossible to solve this problem.
However, we discovered that the error message in the log file from the build wasn't telling us everything. We did some googling on this specific error, which lead us to another problem: some Unity DLL-files, that the TUIO API needed in order to work, didn't follow from the Unity editor to the build library. We added these files, and it worked! We could finally use TUIO in a Unity build.
Getting TUIO and CCV to work
TUIO and CCV problems and solutions

The first important part of our project was to get the computer vision working. Initially we knew that a previous project had utilized the webcam behind the screen in order to create a touch supported program with Unity. However, we also knew that they had not been able to build their project as a single executable file. They could only run the project with working CCV inside the Unity editor.
Firstly we set up a particle system in Unity using Unity's built in shuriken particle system. We did not bother with optimizing the particles system through shader programing at first since we wanted to get the CCV multitouch to work first.
The first system we built only had a 2D particle system on the screen. When a hand touched the screen, nearby particles changed color and/or started falling downwards. We thought this was enough to test whether multitouch would work or not. We also thought we should not develop further than this until we knew if we could build the project as a standalone executable or not.

Figure 1. Each particle within a given radius
from the touch position changes color.
The multitouch did work. Basically we checked, through TUIO, each hand that was touching the screen and called a method multiTouchUpdate(), for each hand.
However, as the number of hands reached two or more, the framerate suffered immensely. With three or more hands, the project was nearly impossible to interact with as the framerate was extremely low.
We concluded this would be fixed both by moving the particle system to the GPU as well as by creating a better algorithm for handling the multitouch. Basically, we realized we had to push the hands into a Dictionary or an Array and update for all the hands simultaneously in unity's "Update()" function.
Unfortunately, the project did not build a project that was runnable - touching the screen did not work. In addition to this, we had no idea how to actually solve the problem as a previous project utilizing the CCV/TUIO had not solved this either. However, we came to the agreement that this was the most essential part of the project right now, meaning the next step in development was to find out why the project did not build correctly and how to fix it. That will be talked about in the next blog post.
CyclooPS' background - where does the project idea come from?
1. Background


Projecting onto a glass screen as in this technological solution cannot deliver touch-functionality without additional technology. Touch functionality on a screen of this size is very interesting for demonstration purposes in several different fields. The main purpose for the visualization studio is to amaze visitors by demonstrating state of the art technology, something which could be achieved with a responsive touch system on the 4K 180 inch screen that creates an impressive visual (or other) feedback.
Therefore, with the addition of an EyeToy camera stationed behind the screen, is it possible to track touches carried out by the users. The so-called TUIO API in turn handles the touch interaction and passes it on to e.g. Unity or some other system that can make use of the input.


The reason that the touch interaction has not been showcased to studio visitors before, is mainly that the applications created for the system have been lackluster. The applications that utilize the TUIO system have not delivered visual (or other) feedback that is, simply put, good enough.
2. Problem
The VIC Visualization studio features an 180 inch 4K back-projected screen. When the studio is showcased, it is custom that we discuss the technical possibility of using the 4K screen as a touch screen. Currently, the studio cannot actually show the touch possibilities as there is no interesting and stable system to showcase it. The idea is to use one or several EyeToy camera(s) to capture the backside of the screen by tracking black blobs that appear when the screen is touched by the user(s).
At the moment, when guests arrive at the studio, they are greeted by a 4K slideshow. We aim to replace this, or add to this by developing an aesthetically pleasing graphical system. The main goal is showcasing the visual brilliance of the screen as well as the interesting idea of a touch-screen of this magnitude.
3. Implementation
There already exists a plugin for Computer Camera Vision and TUIO for Unity, which makes this game engine the obvious choice. Scripting language will be C# as we have previous experience. Graphics will be done in OpenGL with vertex and fragment shaders. The server we are building the project on has an older graphics card which supports up to DX10. Thus, compute shaders are not an option.
Prenumerera på:
Inlägg (Atom)